 Sign in
 Anonymous
on May 9th 2012
0
Anonymous
on May 9th 2012
0
😊 szymon is
Learn how to prepare a low quality jpg image for conversion to icon in RealWorld Icon Editor.
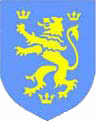 Source image | Created icon |
Hello, this video demonstrates how to turn a low quality .jpg image into an icon. I have received the source image from one of the users of RealWorld Icon Editor and I'll use it to show you how to prepare the image for conversion.
First I'll delete the white background. I'll use the Erase with Flood fill tool and I'll play for a while with the tolerance parameter until I am happy.
Next, I'll switch to the ordinary flood fill tool to remove artifacts from the blue shield. Hold down the CTRL key and click on any blue pixel. This sets the current color to blue. Note that the cursor changes when the CTRL key is down. Then click again and the artifacts in the vicinity of the clicked pixel are removed. Repeat until the blue shield is clear.
Now, switch to the Brush tool. Set its radius to an appropriate value (this depends on the size of your image) and set the Blur parameter to just 10%. Hold down the CTRL key again and click a yellow pixel. The current color changes
to yeallow. Paint around the outlines of the lion to improve it. You can easily pan the image by moving your mouse with the middle button (or the mouse wheel) pressed.
The artifacts in the image were caused by the .jpg compression and possibly by a low quality photo used in the first place. Always try to get the best image possible before you start retouching it. This image is relatively small, hence I will not be able to make a Vista icon with 256x256 pixels. If I really wanted to have an icon in Vista format, I would need to upscale the image as the very first step. That will make the image very blurry, but I'd be able to reduce the blurriness in this step.
When needed, reduce the radius of the Brush to be more accurate.
Switch to blue color again (using the CTRL key) and use the Brush to make the gaps larger. If you do not like the change, simply use the Undo function. The Undo function can be invoked by a simple mouse gesture.
Whe you are happy, click the Create Icon button. Check the standard formats (16, 24, 32, and 48 pixels) and click OK. Not bad, we could end here, but I'll show you one more trick to separate the lion from the shield. Close this window with the created icon.
Switch to the Magic wand tool, hold down the SHIFT key and click on all the yellow parts to select them. You may need to change the tolerance. When all are selected run the Drop shadow function from menu. This will add a shadow around the selection. Play with the parameters and when it looks OK, click OK.
Now create an icon from the image again. Isn't this better? A little bit yes.
These were some of the basic techniques to prepare low quality images for conversion to icon, but there are of course more techniques.
 Recent commentsAnonymous
on May 9th 2012
0
Recent commentsAnonymous
on May 9th 2012
0
😊 szymon is
Anonymous
on June 30th 2012
0
We have cookies 😁 epic background.
Anonymous
on August 9th 2012
0
:/ I can't figure out how to make a red text with white around it. help?
 Parsa
on April 30th 2024
0
Parsa
on April 30th 2024
0
yes
 reddit
 Facebook share