 |
|
How to modify images using drawing tools?April 7th 2005 |
This guide introduces the basic drawing tools available in RealWorld Icon Editor - pencil,
lines, polylines, curves, rectangles, ellipses, text, and dropper.
The drawing tools are used to modify both raster images and icons.
Tools for flood filling, moving and resizing rectangular regions, and creating projected shadows will be discussed in a follow-up article.
This guide is intended for people with basic knowledge about RealWorld Icon Editor. It is recommended
to go through the application tutorials first.
Blending and rasterization modes
All basic drawing tools (except Dropper) take into account current Blending mode
and current Rasterization mode.
Blending modes
The blending mode controls how is the new shape mixed
with already existing image.
|
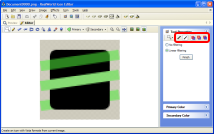
The semitransparent green lines were drawn using Paint Over, Replace, and Paint Under blending modes. The red marker indicates the controls used to set blending and rasterization modes.
|
The first green stripe on the screenshot was drawn using
the Paint Over mode. Because the current color was partially transparent, you can see
the black pixels behind the green stripe.
Replace mode was used with the second stripe. The black pixels were completely
replaced by the semitransparent green ones.
The last stripe employs the Paint Under mode.
It works just like the Paint Over, but switches the foreground and background pixels. In
our case the result is the same as if the green stripe was drawn first and the black rounded
rectangle second. This mode can save you some time, for example when you need to put your image
on opaque background - just draw a rectangle behind the image.
Points of interest:
- If your current color is completely opaque (alpha is 255), there is no difference between Paint Over and Replace modes.
- If your background is opaque, the Paint Under mode would appear to have no effect.
- If your current color is completely transparent (alpha is 0), all drawing occurs in
Replace mode, because other modes would have no effect. This saves you time switching to
the Replace mode manually when erasing pixels.
Rasterization modes
There are two rasterization modes: Smoothing and No smoothing. In the first mode,
antialiasing is applied to smoothly blend edges of drawn objects. The second mode produces objects with jagged edges.
Also, the drawing tools offer less options in No smoothing mode - you will not be able to
set outline width or polyline join type.
Primary and secondary colors
If a tool requires single color, left mouse button uses primary color and right mouse button uses secondary color.
In cases, where the tool requires two colors, using right mouse button swaps them.
Images without alpha and images with palette
The raster image editor integrated into RealWorld products is aimed at truecolor images with
full alpha channel. When capabilities of currently edited image format are limited,
the drawing tools are limited as well:
- If image lacks alpha channel, the Paint Under blending mode is useless.
- If image has only 1-bit alpha, outlines of shapes drawn on transparent
background cannot be smoothed and very transparent shapes will not be visible at all.
- If image uses palette instead of direct color, the palette is calculated dynamically
as you draw. The image is then dithered. Drawing in this mode may be slower.
Pencil tool
The pencil tool is very simple, it allows you to replace pixel colors. When in Paint Over mode
and using semitransparent black or white color, you can darken or lighten individual pixels
to finetune your icon.
Line tool
This tool allows you to draw lines and polylines with selected joins and caps and
defined width. When in polyline mode, draw the initial line just like in single line mode,
then click anywhere to continue the polyline. To finalize a polyline, right-click in
the raster editor or click the Finish button on the properties panel. Until the polyline
is finalized, you may change its properties or color and you may change the position
of joins by dragging them with mouse.
|
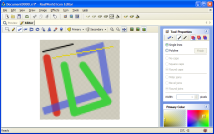
Black and red lines demonstrate different line widths and caps. Blue and green polylines show various joins styles. Yellow line is not using antialiasing.
|
Note: the control point size is one image pixel, you might need to zoom in to be able to
see them.
Curve tool
This tool draws 3rd-degree approximation curve that passes through all specified points.
Start the curve just like you would draw a line, drag from first point to second point. Then press mouse
button at the desired third point and eventually move it and release it. Continue until
you place all required points. You may change point position later by dragging it. Once
you are happy with the shape, click the Finish button or right-click in raster editor window.
|
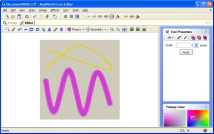
Pink curve was drawn with smoothing mode enabled, while yellow curve not.
|
Note: the control point size is one image pixel, you might need to zoom in to be able to
see them.
Ellipse tool
This tool allows you to draw filled ellipses and circles or their outlines.
Select the type (filled, outline, filled with alternate color), outline width and
draw the ellipse by dragging your mouse from one corned of a bounding rectangle to the opposite one.
Rectangle tool
Rectangle tool can draw filled rectangles, rectangle outlines, and rectangles filled with alternate color.
Corners of rectangles are rounded if Radius property in properties panel is greater than 0.
|
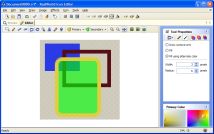
Blue filled rectangle, dark brown rectangle outline and a rounded rectangle filled with secondary color.
|
Text tool
Type text into the large edit box in properties panel, then click in the raster
editor to place the text. You may move your mouse while the mouse button is down
to see how the text would fit into your image. Font properties are accessed by clicking
the Select font... link in properties panel.
|
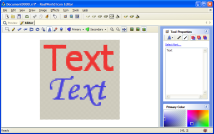
Windows GDI is used to draw text. Font name, size, and style can be selected.
|
Dropper tool
Click on a pixel in raster image editor to transfer color of that pixel into primary (left click) or
secondary color (right click).
If you are using one of the other tools described in this guide and holding down CRTL key,
active tool is temporarily switched to Dropper.
Resources
Summary
Described drawing tools cover the basic needs expected from each raster image editor.
They support ordinary and antialiased drawing quality, various blending modes as well as
floating point parameters (for example line width of 2.5 pixels).
 Recent comments
 Anonymous
on September 25th 2010
0
Anonymous
on September 25th 2010
0
pOR FAVOR , TAVA USANDO AQUI E NAO SEI O QUE FIZ, MAS SUMIU MUITOS ICONES COMO O LAPIS E TODOS OS OUTROS TEM COMO EU COLOCALOS DE VOLTA, TENTEI DESINSTALAR E REINSTALAR MAIS VEIO DA MESMA FORMA ME AJUDA POR FAVOR, E-MAIL thomas-paixao@r7.com
grato
Fireguns
on April 17th 2011
0
i have a better tutorial than that crap
Anonymous
on February 6th 2012
0
Look, I just want to cut out a face and put another one on. Why cant you give a simple tutorial on this instead of all this double speak? I downloaded this cause it was supposed to be simple, but this is frustrating. I guess I will uninstall this and search for something else.
 Sign in
 reddit
 Facebook share