 Sign in
 Anonymous
on February 1st 2008
0
Anonymous
on February 1st 2008
0
cool | How to create 3D text?November 13th 2005 |
This is a detailed tutorial on making 3D text in RealWorld Icon Editor. 3D text can be incorporated into icons or used as a standalone image.
This guide is intended for people with basic knowledge about RealWorld Icon Editor.
While the primary function of RealWorld Icon Editor is to create icons, it also harbors a raster image editor, a 3D graphics editor, and a rendering subsystem. These components make it possible to create 3D text and use it in icons or images.
Images with 3D text are created like any other images based on a 3D model:
Create new document using "New Unicorn3D document" prototype. The new document is empty.
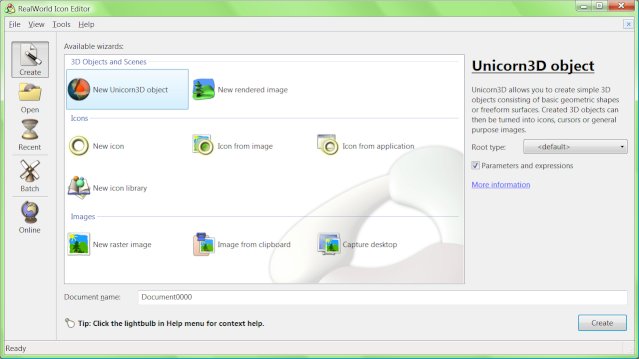
Create new Unicorn3D document by selecting the New Unicorn3D document wizard and clicking the Create button.
Add a new component to clicking on the 'Insert Component' toolbar button and selecting '3D Text' from the popup menu. A 3D text component is added. Most of the properties of 3D text component are modified in the tree view.

The actual text is controlled by the tree item marked with a red dot and a number (1). To change the text, select this item with mouse and start typing a new text.
Item (2) controls the font. Right-click the item and select a font from the popup menu. You may also change the font by manually writing its name or a part of it. Subitems of the font item allow selecting one of available code pages and styles (bold, italics) if the font directly supports them.
Item (3) controls the 3D shape of the text. You may choose whether to draw the back side of the characters and whether or not the characters should actually be extruded and have depth. There is also an experimental option, which allows you to control the extrusion using a NURBS curve.
The item with two or three numbers below item 'Geometry' controls the size of the text. Change the numbers to apply zoom to width, height, and depth. The other two items set the alignment of the text - current version only considers the horizontal alignment.
The material item (4) works in the same way as with other 3D objects. A diffuse and bump textures may be enabled and selected. Direction of generated texture coordinates is hardcoded.
Change the text to '3D', font to 'Times New Roman', style to 'Bold', size to (0.7, 1, 0.5), and material color to (0.8, 0.2, 0.2).
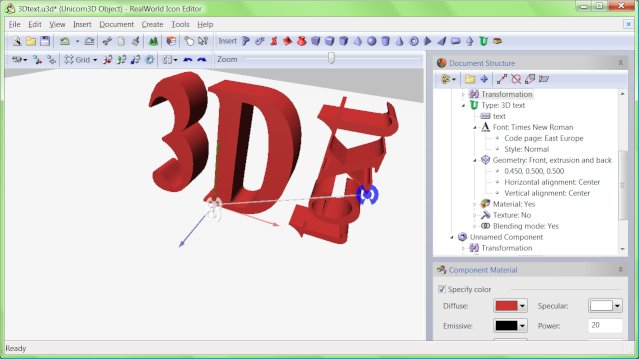
This model was made from two components ('3D' and 'text'). A rotation and translation is applied on the 'text' part.
Insert another '3D Text' component. Change its text to 'text', font to 'Times New Roman', size to (0.45, 0.5, 0.5), and color to (0.8, 0.2, 0.2). Click and expand the 'Transformation' node. Position the component according to the screenshot using the control point or by manually setting the rotation and translation items (under the Transformation node). Their values are (0, 0, 1, -1.584) and (1.8, 0.8, 0).
Before rendering the 3D model to image, add one more component - a box. Set the size of the box to (10, 0, 10), move it 0.2 down, and set its color to white. The result is a white plane below the 3D text. This plane enables us to have a shadow below the 3D text.
Preparing the scene
Preparing a scene with a model of 3D text for rendering. The blue dots represent multiple directional lights used to create a soft shadow.
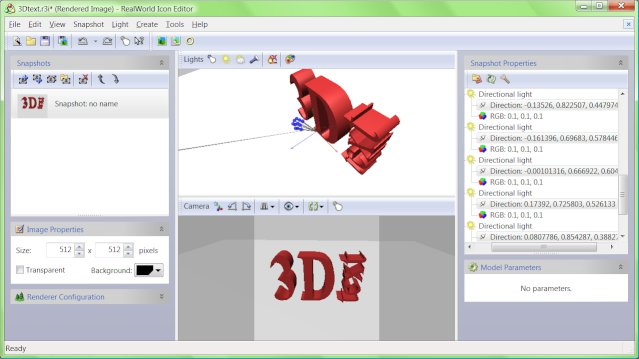
Click Create image command in 'Create' menu or in toolbar. A new window is opened. Set the camera according to the screenshot, increase image size to 512x512, and add one ambient and multiple directional lights.
The rendering device only supports hard shadows, but by using multiple low-intensity lights, we can successfully simulate soft shadows. Remember to reduce the intensity of the lights. Our example contains 11 directional lights with color intensities set to (0.1, 0.1, 0.1). The direction of each light should be slightly different.
Once you are happy with the camera and light, render the image by clicking 'Create image' in 'Create' menu.
The work is nearly done. Resample the image to 128x128 pixels and remove the borders. The resulting image is displayed below.

This guide showed one of the possible ways how to create images with 3D text in RealWorld Icon Editor.
The article did not cover an important case, where 3D text extrusion is controlled by a NURBS curve. This option will be described separately in another article.
 Recent commentsAnonymous
on February 1st 2008
0
Recent commentsAnonymous
on February 1st 2008
0
cool3 text
d
[OMG]Kevinicons
on February 8th 2008
0
Make cool text next time your text is shiny and gold.
[OMG]Kevinicons
on February 8th 2008
0
The article did not cover an important case.
Anonymous
on April 25th 2008
0
nonsence, at olabisi onabanjo university in Nigeria we were taught diffrently
taylorl3ighxo
on May 20th 2008
0
i like this
Anonymous
on August 12th 2012
0
😎 this is epic man thanks
Anonymous
on November 8th 2012
0
cool thanks
how can i get or download the setup
 Roxy-1
on February 15th 2014
0
Roxy-1
on February 15th 2014
0
Okey
Is cool
How do you change text size and color on this site's comments and cursor & icon description?
Find out how Vista icons differ from XP icons.
See how RealWorld Icon Editor handles Vista icons.

 reddit
 Facebook share