 Sign in
 Anonymous
on October 22nd 2009
0
Anonymous
on October 22nd 2009
0
Hello Bob 😊
can I ask you a question please? - by can I ask you a question please? on December 5th 2025
is it ok if I upload an image? - by can I ask you a question please? on December 5th 2025
 | How to compose icon from parts?March 27th 2006 |
This tutorial explains how to make an icon by composing multiple images from a library of icon parts in RealWorld Icon Editor.
This tutorial assumes that you have already downloaded and installed image pack of parts called Vista by Kudesnick - Round. If you do not have this library, please download and install it before continuing.
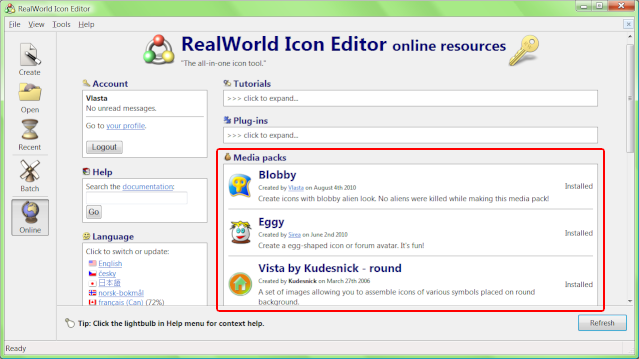
Find the Media packs section on the Online page in RealWorld Icon Editor
To download an image pack, open RealWorld Cursor Editor and go to the Online page. Then find the Media packs section  - you may either close the sections above it or simply scroll down. Finally, click on the Download link next to Vista by Kudesnick - Round and wait until the download finishes.
Although our ultimate goal is to create an icon, we start by creating a raster image. Switch to the Create page, select New raster image wizard, set image size to 256x256 pixels and click on the Create button.
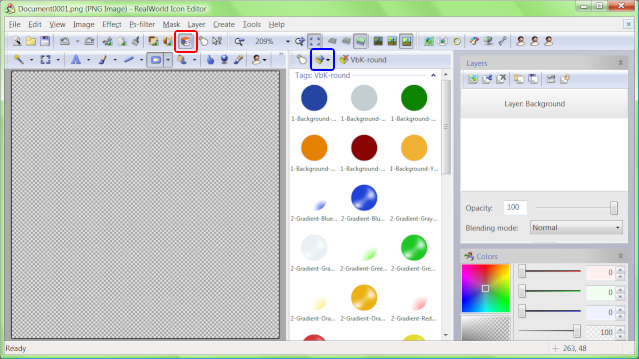
Open or close the media library panel from the main toolbar.
Click on the Media library button in the toolbar to display panel with media library. Then click on the Activate tag  button and choose VbK-round in the menu.
Double-click the 1-Background-Blue.png file in the media panel. Notice that a new layer containing the blue sphere was added. Alternatively, you can drag and drop the image from the media library onto the layer list or onto the raster editor. If you drop it on the raster editor, it will be added as a floating selection rather than a layer.
Do it again, this time with 2-Gradient-BlueDouble.png. Note that the second image is drawn on the top of the first one. You can adjust properties of the new layer such as opacity or blending mode.
Add third file - 3-Symbol-Home.png. Because the images are added as layers, you can apply effects to them. Simply click on Colorize in the Effect menu and change the color of the symbol to yellow. You can apply effects to any layer at any time.
![]()
Colorize effect is being applied to the selected layer.
Add three more images: 4-Effect-HilightDouble.png, 4-Effect-ReflectionRounded.png, and 5-Frame-Metal-2.png.
Simply click on Create icon button in toolbar or in Create menu. New window opens and allows you to select sizes to generate. The defaults should be OK, so just click OK.
The icon looks fine, but let's add a projected shadow to the largest image. Switch to Projected shadow tool and drag with your mouse as indicated by the red arrow on the following screenshot. Experiment with the properties of the Shadow tool to get the results you like.

Switch to Projected Shadow tool and drag with your mouse as indicated by the green arrow to create a projected shadow.
If you followed the steps of this tutorial, your icon will be similar to the following one:

I have cheated a bit and actually moved the large icon by few pixels up to have more space for shadow 😉. Feel free to do the same.
Creating icons from parts is matter of minute or two. While combining images does not offer the same level of freedom as manual icon design does, it is a viable alternative and has many applications.
When combining images, feel free to use all other features of the application. Remember that you can apply filters like Motion Blur or rotate parts of the final image to customize the resulting icon. When creating small versions of icons, consider using operation Remove Empty Border and applying a shadow during image to icon conversion to get different and possibly better results.
 Recent commentsAnonymous
on October 22nd 2009
0
Recent commentsAnonymous
on October 22nd 2009
0
Hello Bob 😊
Anonymous
on January 28th 2011
0
I just want to concatenate the images into one long image so that site mapping will allow me to navigate the image but it will load faster
Anonymous
on May 21st 2012
0
Manolo muito bom, mais como baixa O negócio? Troll Faces!!!!
 Twe
on November 8th 2012
0
Twe
on November 8th 2012
0
Some more things, you can also download "Vista by Kudesnick - Triangle" and "Vista by Kudesnick - Shield"!
Anonymous
on April 5th 2020
0
Some more things, you can also download "Vista by Kudesnick - Triangle" and "Vista by Kudesnick - Shield"!
![]()
![]()
Anonymous
on May 6th 2022
0
😁 :-D 😁 :-D 😁 :-D 😁 :-D 😁
Anonymous
on February 18th 2023
0
SFEFSEEFSEFSESFESFEFS
Please update the icon assembler. Add more icon parts there and more colors.
Anonymous
on April 29th 2025
0
e
Find out how Vista icons differ from XP icons.
See how RealWorld Icon Editor handles Vista icons.
 reddit
 Facebook share