 Sign in
 Anonymous
on July 11th 2016
0
Anonymous
on July 11th 2016
0
When i tried to use my icon it just shows like an image of earth with a swirl or something next to it. how do i fix it?
 | How to create an icon from an image?November 6th 2005 |
This tutorial describes how to make icons from images in RealWorld Icon Editor and explains how to prepare images to attain best possible results.
Reader of this guide should be familiar with basic terms related to computer images and icons as discussed in articles about computer images and Windows XP icons.
Icon is a container of several images, where each image is optimized for specific color depth and screen resolution. When creating icons from image, the task is to resample the image to specified sizes and adjust it to specified color depths.

An image with alpha channel and an icon generated from the image.
Since an icon usually has a transparent background, the conversion should either use transparency information from the source image or determine the transparency using another method.
This is a three-step process:
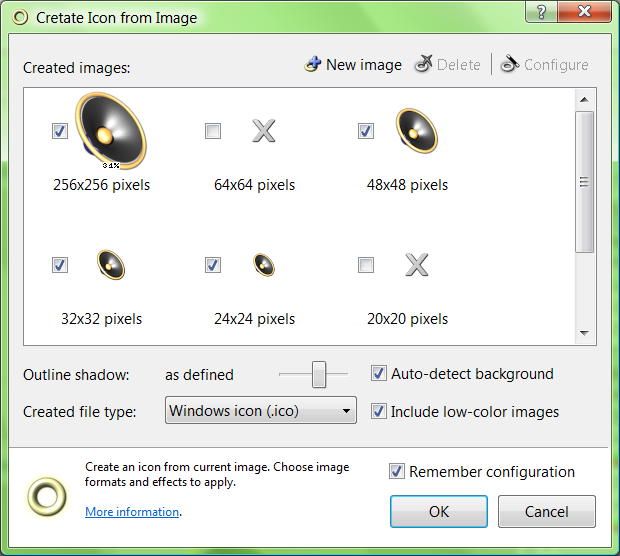
An icon is created from image by clicking on Create icon toolbar button.
The application comes with a pre-configured image to icon converter with standard image formats. Users may add their own or modify the default image formats.
An icon is only as good as the image it is created from. For best results, follow these guidelines:
As mentioned earlier, icons have transparent background. Best results are obtained if source images already have correct alpha channel (use an adequate file format such as PNG). RealWorld Icon Editor can create icons even from images that are missing an alpha channel, although there are additional conditions.
If the original image does not have an alpha channel, the color of the first pixel (or a user defined color) is assumed to be background and it is considered transparent. Make sure that the background color is never used in the actual image (hint: do not use white or black as a background color). Also, avoid using images with smooth edges. If an object is mixed with background, it is virtually impossible to remove all traces of the background.
 |  |
| Good (large, square, no borders) image for image to icon conversion. | Bad image for icon conversion: it is small, has redundant empty borders, its edges are blended with background. |
 Icon created from the left image. A shadow effect was used to enhance object's outline. |  Icon from the right image is smaller than necessary, has wrong proportions, and an unwanted cyan outline. |
If a source image is stored using a lossy image format such as JPG, it contains artifacts. Images with artifacts are not suitable, because background and foreground are mixed and the application is unable to separate them. This is similar to the problem with smooth edges.
A raster image editor integrated in RealWorld Icon Editor can help you fix most problems with source images and prepare them for conversion to icon.
To edit an opened image, click 'Edit as Raster Image' command in 'Document' menu or on toolbar. The application window is now showing the image in edit mode. Enable alpha channel in 'Document'->'Raster Image Properties' dialog and use the Flood Fill tool to remove background manually (replace it with transparent color). Experiment with the tolerance parameter of the Flood Fill tool to remove image artifacts and/or antialiased outline.
Once the background is fixed, switch to the 'Image Viewer' layout. Activate the 'Remove Borders' operation in 'Document' menu to automatically remove empty borders and center image in the smallest square possible. The image is now ready and you may use it to create a new icon by clicking one of the 'Create Icon' commands.
RealWorld Icon Editor offers two unique features related to image to icon conversion.
Almost all Windows XP icons have some kind of shadow or outline enhancement effect. These effects, when used appropriately, give icons uniform style and improve the recognition speed by emphasizing important features of an image. It is of course possible to incorporate these effects into the source image manually, but it would be a lot of work, because:
 No shadow - contours are hard to recognize. |  Simple shadow improves look and feel. |  Custom shadow for each image in an icon. |
RealWorld Icon Editor can do the above automatically. It is of course customizable and you may easily change your preferences for a single icon or on a project basis.
Prior to Windows XP, pixels in icons were either fully transparent or fully opaque. These icons had jagged edges, because smooth edges require semitransparent pixels. These images are still present in Windows XP icons and they are used when color depth of the screen is set to Hi-Color or lower or when an icon is used on older Windows. More information in article about XP icons.
RealWorld Icon Editor allows optimizing pre-XP icons for predefined background color. These icons perform well on all kinds of light backgrounds, especially on toolbars, in menus, and dialogs. The ultimate choice is of course yours. You may enable or disable optimized pre-XP icons in the configuration dialog of the image to icon transformation.
 Standard pre-XP icon. |  Pre-XP optimization improves edges. |  Optimized icon with shadow effect applied. |

The same icons on a gray background. This is the color of Windows 2000 toolbars.
The quality of the optimized icons is getting close to Windows XP icon quality.
After reading this tutorial, you should know what is involved in an image to icon transformation, you should also know how to spot unsuitable images, how to fix them, and how to create icons in RealWorld Icon Editor.
This article covered only the basic techniques. If you cannot find certain feature or feel that something is more complicated then it should be, please leave your comment here or in the support forum. There is a good chance that a solution for your problem already exists.
 Recent commentsAnonymous
on July 11th 2016
0
Recent commentsAnonymous
on July 11th 2016
0
When i tried to use my icon it just shows like an image of earth with a swirl or something next to it. how do i fix it?
 ThuggzBunny
on May 19th 2017
0
ThuggzBunny
on May 19th 2017
0
A big problem I keep having is once an image (say png) is converted to bmp it loses transparency. I have seen comments made on other forums where people are insisting that bitmap images can't have transparency. 😉 I know that's false because there are icons & things like bmp start orbs that have an alpha channel. Will Real World Icon Editor or the Online Icon Creator produce bmp icons that keep their transprency? Thank you for your time. 😊
avia
on November 11th 2018
0
Problem on Windows 10: I made icons, changed them on my desktop through properties. I restarted the computer and they were gone, back to a generic folder. Only on one, when I selected 'previous version' was the new icon available. Please HELP! What am I doing wrong?
Anonymous
on December 13th 2019
0
Hi,
Nice application, online help could be more helpful though.... 😉
Harryest Potter
on November 3rd 2020
0
I don't know how to create all t does is tell me about it I need to know where to go to create.
Anonymous
on November 14th 2020
0
Not Bad, Thank you for the tips
 hackercursor
on April 27th 2021
0
hackercursor
on April 27th 2021
0
😊
SMG7
on February 13th 2023
0
BORING 😴
Anonymous
on January 18th 2025
0
Amazing! 😉
joseph
on April 27th
0
yampa😉
Find out how Vista icons differ from XP icons.
See how RealWorld Icon Editor handles Vista icons.
 reddit
 Facebook share