 Sign in
Hey, I'm already seeing ways this can be used as more than just an "effect." It could be handy as a tool as well.
Can it split buy more than three? I imagine it would be possible by asking the user for input regarding what it should split by.
Kaleidoscope image effect
Kaleidoscopes use carefully arranged mirrors to create beautiful symmetrical images. Because mirrors are all that is needed, creating a kaleidoscope software effect is not hard and it can be done with the JavaScript operation as explained later. But first, let's look at some images:
 Cloudy mountains. | 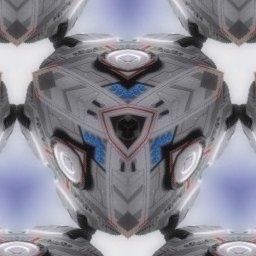 The Defiant from StarTrek DS9. |  RealWorld Icon Editor logo. |
The result of the kaleidoscope effect can be surprising. The images above also have the glow effect applied to them for better atmosphere.
Getting it to work fast
Download this: kaleidoscope.rwcommands
Drag and drop it on the toolbar with image effects (the last one in the first row, the one with the beige user icon). Alternatively, right-click on the toolbar and then click the import button and import the downloaded files. A new button called "Kaleidoscope" appears.
Draw something and click the button. The effect looks best on a black background with the glow effect applied.
How does it work?
A real kaleidoscope uses mirrors to place numerous rotated and (of course) mirrored versions of an object in front of the viewer's eye. The scripted effect uses the rotate operation and the transform image operation to place copies of a drawing on a canvas.
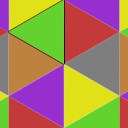
The image above represents a structure of the kaleidoscope canvas. The green triangle with a black outline holds the pattern. Whatever is drawn there, remains in the same place when the effect is applied and whatever is there also gets copied to the other triangles. Of course, the content is rotated and/or mirrored in the other triangles.
There are additional green spots on the image. These are direct copies of the main green triangle. Similarly with other colors.
The actual code
This is the actual code for the Kaleidoscope filter. If you did not download the effect above, you can copy and paste it directly to the Effect->Custom operation box:
var src = Document.RasterImage;
var nX = src.sizeX;
var nY = src.sizeY;
// erase everything except a triangle
// in the upper left quarter of the image
DrawTool.SetColor1(0, 0, 0, 0);
DrawTool.POLYGON(src,
0, 0,
nX*0.5-.5, -0.5,
nX*0.5*0.1339746-0.75, nY*0.25,
nX*0.5+0.5, nY*0.5+1,
nX*0.5+0.5, 0,
nX, 0,
nX, nY,
0, nY);// duplicate original image and
// rotate it by 120 degrees
var img1 = Document.Duplicate();
var rotation = Operation.Create("Raster Image - Rotate");
rotation.Angle = 120;
Operation.Execute(rotation, img1);
Blender.Compose(img1, 0, 0.25*nY, nX*0.5*0.1339746, 0.75*nY, img1, nX*(1-0.1339746), 0.25*nY, 0, Blender.OpPlus);// duplicate original image and
// rotate it by 240 degrees
var img2 = Document.Duplicate();
var rotation = Operation.Create("Raster Image - Rotate");
rotation.Angle = 240;
Operation.Execute(rotation, img2);
Blender.Compose(img2, nX*0.5, 0, nX*(1-0.5*0.1339746), nY*0.25, img2, nX*0.5*0.1339746, nY*0.75, 0, Blender.OpPlus);
Blender.Compose(img2, 0, 0, nX*0.5*0.1339746, nY*0.25, img2, nX*(0.5-0.5*0.1339746), nY*0.75, 0, Blender.OpPlus);
Blender.Compose(img2, nX*(1-0.5*0.1339746), nY*0.7, nX, nY*0.8, img2, nX*0.5*0.1339746, nY*0.7, 0, Blender.OpPlus);// add other instances of the first triangle
Blender.Compose(src, nX*0.5, nY*0.75, nX*(1-0.5*0.1339746), nY, src, nX*0.5*0.1339746, 0, 0, Blender.OpPlus);
Blender.Compose(src, 0, nY*0.75, nX*0.5*0.1339746, nY, src, nX*(0.5-0.5*0.1339746), 0, 0, Blender.OpPlus);
Blender.Compose(src, nX*(1-0.5*0.1339746), nY*0.2, nX, nY*0.3, src, nX*0.5*0.1339746, nY*0.2, 0, Blender.OpPlus);// combine the 3 images and we are half way there
Blender.Compose(src, 0, 0, nX, nY, img1, 0, 0, 0, Blender.OpSrcOver);
Blender.Compose(src, 0, 0, nX, nY, img2, 0, 0, 0, Blender.OpSrcOver);// now, we need to flip the image horizontally
var img3 = Document.Duplicate();
var flip = Operation.Create("Raster Image - Transform");
flip.Pt1X = 1; flip.Pt1Y = 0;
flip.Pt2X = 0; flip.Pt2Y = 0;
flip.Pt3X = 0; flip.Pt3Y = 1;
flip.Pt4X = 1; flip.Pt4Y = 1;
Operation.Execute(flip, img3);
// and combine it with the unflipped one
Blender.Compose(src, 0, 0, nX, nY, img3, 0, 0, 0, Blender.OpSrcOver);The script first erases everything except the pattern triangle (with the DrawTool.POLYGON command), then it starts to rotate and copy the triangle all over the canvas and combines the fragments.
 Recent comments
Well, the classic kaleidoscope works like this. There are also other variants with different mirror arrangements, but this one is the one with best properties. The equilateral triangles are forming the hexagons and there are no visible seams or gaps. Making the repetition count configurable is possible, but there would be gaps and discontinuities in most cases.

 reddit
 Facebook share