 Sign in
Very nice explanation. By the 3D image example picture- is it possible finally to create holes in objects?
Bevel effect explainedFebruary 10th 2011 |
This article explains what the bevel effect does and how does it accomplish its task. No special knowledge is needed to understand this article, although you should be familiar with the way computers represent and store images.
What is Bevel effect?
The bevel image effect seeks to add depth to an image. It got its name, because a beveled shape on an image looks like a real beveled edge of a wooden, metallic, or plastic item. Let's look at a simple example:
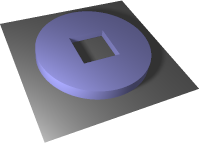
 The source image. |  Bevel effect applied. |
What is the difference between the two images?
The 2-dimensional shape of image remains the same - it is a circle with a square cut out in both cases. If you study the images for a while, you'll discover that the only difference is brightness of certain areas. On the beveled image, the top left edge of the circle is brighter and the bottom right edge is darker. That is all.
Why does it seem that the beveled image has depth?
It is your brain working. Because you have seen a lot of lit 3D objects in your lifetime, your brain has learned to estimate the 3D shape of an object from a lit 2D image. If the lights and shadows are consistent, the object appears to have volume.
How does Bevel effect work?
A bevel filter typically performs the following 4 steps:
- Determine the outline of the drawn object.
- Extrude the 2D object into the 3rd dimension.
- Bevel the edges of the 3D object.
- Illuminate the 3D object to obtain locations of highlights and shadows.
First step is relatively easy. In most cases, the transparency (alpha) channel of the image is directly used to determine the shape of the object. If the transparency is unavailable or inadequate, image mask (selection) may be used.
In the second step, the regions inside the shape are assigned given height and a 3D object is obtained. The left image below shows a 3D object created from the example image used in the beginning of the article.
Beveling is a 3D operation and since we have a 3D object available now, we can bevel its edges. The beveling can be as simple as on the image below, where the edges are simply cut under the angle of 45 degrees. Alternatively, the beveling can have a more complex shape, for example rounded.
 2D shape extruded into the 3rd dimension. | 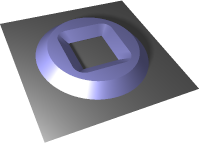 Upper edges of the 3D object were beveled. |
The height of the 3D object is usually configurable. It is called Amount in the RealWorld bevel effect.
The last step is computing lighting effects on the 3D shape. This is not hard, but there are many variables. The result depends on the properties of a light source (or sources), properties of the material the 3D object is made of (plastic, metal, ...), and on the position of the viewer. For example, the following image shows how the 3D object would look like if it were lit by two colored lights. A purple light is above the object to the left while a greenish light comes from lower right corner.

A typical bevel only uses one light source and the light source is usually white to keep the colors of the beveled image close to the original. But this is only the choice of the designer of the bevel effect.
How is it really done?
This section may be a bit technical, feel free to skip to the next section if you are not interested in the inner workings of bevel.
Now that you know the theory behind beveling, let's look at how we can simplify the complicated process described above.
We did all that complicated 3D stuff for one reason: to compute the light reflection at each pixel. A surface that is facing the light source is more illuminated than the one that the light hits at angle. This is a simplification, but it is good enough simplification.
In order to compute the lighting at each pixel, we need to know the orientation of the surface the pixel represents. In more technical terms, we need a surface normal for each pixel. Once the normal is known and the light direction is known, computing the illumination level is trivial - a dot product of the normal vector and the light direction. (This works for distant light sources, like the sun).
To summarize: a full 3D object is not needed, only the surface normal at each pixel is.
The normals can be obtained for example this way:
- For each interior pixel, compute how far it is from the edge and assign this value to the pixel. If the value is higher than given limit (the Amount parameter), assign the limit instead of the actual distance from edge. This value will be called the height of the pixel.
- Compute surface normals for pixels by using the x and y coordinates of the pixel and the pixel height from the previous step. Given the 3D position of the pixel and the 3D position of its neighbors, it is possible to compute the normal direction.
The described method is not ideal. It deals with discrete pixels. The information about the actual smooth shape (the circle in the example above) is lost and instead of smooth normals, the result is noisy and has unnatural visible discontinuities. To fix this, a smoothing step is performed after the heights are computed. This is what the Blur parameter in the RealWorld bevel effect window controls.
The smoothing not only masks the discontinuities in the height map, but it also rounds the beveled edges.
Examples of bevel
Bevel is often used when creating text or to make simple shapes more attractive. An alternative use of bevel is for unobtrusive watermarking, where the shape to bevel is taken from one image (via selection) and used on another.
 Beveled text is a popular choice. |  Beveling a simple shape. | Bevel effect can be used for unobtrusive watermarking. |
Using bevel for best results
Bevel uses the capacity of the human brain to guess a shape of a 3D object from the position of lights and shadows. Use that to your advantage.
Use bevel consistently
The human brain can be confused if there are multiple inconsistent beveled objects in one image. Similarly, if there are multiple images that are being used together, they should be using consistent bevel effect.
Use bevel sparingly
Too much of a good thing is a bad thing. Don't overuse bevel, just like any other effect. An image with lots of eye candy draws attention, but it becomes a distraction quickly. Less it often more.
Combine bevel with shadows
Bevel has a 3D aspect, just like shadows have. If you use a light shining from top left, add a shadow under the object and shift it to the right and downward. Shadow reinforces the 3D feeling and helps the brain position the individual things in space.
Use bevel as layer effect
All RealWorld tools support layer styles. Bevel is a very good filter to set as a layer effect. When using bevel as a layer effect instead of applying it directly, it allows you to modify the content of the layer and the same effect is automatically applied to the modifications.
Make your images larger
The discrete character of raster images (consisting of pixels) causes inaccuracies. The Blur parameter of the bevel effect compensates that, but at a cost. It should be set to at least 8 pixels to make the visible cracks go away. There is a workaround though: if your target is to get a smooth 256x256 image, start with an image 4 times larger (1024x1024), apply the bevel effect at this larger resolution and downscale the image as the last step before using it. This way, the Blur parameter will effectively be 2 pixels (8/4).
Summary
The bevel effect can add a bit of depth into an otherwise flat looking image and make it come alive. In order to do so, it simulates the illumination of a real beveled shape. When using bevel, make sure, you are using it consistently throughout the entire image.
The bevel effect is part of every RealWorld graphic editor, you can play with it for example in the free Paint.COM.
 Recent comments
Not yet, the holes were part of the design.
 Anonymous
on August 19th 2013
0
Anonymous
on August 19th 2013
0
Can you explain, how bevel works according to Photoshop parameters? http://d2f8dzk2mhcqts.cloudfront.net/LSS_06_Bevel/02.jpg
Anonymous
on May 4th 2021
0
Excellent Explanation. It saved my life. It would be helpful if you explain bevel effect using photoshop.
Bookmark and share
 reddit
 Facebook share
Graphics resources links
Vista & Win 7 icons
Find out how Vista icons differ from XP icons.
See how RealWorld Icon Editor handles Vista icons.