 Sign in
why not have a triagle caps? a way of having a pointed tip
Curve drawing tool
 CURVE is a drawing tool capable of drawing smooth curves passing through given points. The curve may have arbitrary (non-integral width) and selected cap style.

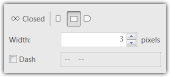
Curve configuration panel
 Version 2013.1 | 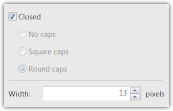 Older versions. |
The Closed option only affects a curve that is not a trivial line (at least one extra point has been added to it). In that case, the end of the curve is smoothly connected to the beginning.
The Cap mode of the Curve tool controls how to decorate the ends of the curve or dash segments. You may select either nothing, a rounded cap or a square cap. Square cap means that the curve reaches behind the end point (by an amount equal to width of the line divided by 2).
The Width option controls the width of the curve in pixels. This value must be greater than 0 and it does not need to be a whole number. For example, width of 2.8 pixels is allowed.
The Dashing pattern (supported since version 2013.1) is a sequence of "-" (minus) and " " (space) characters and controls how to dash the line. "-" indicates a line segment equal to line width, while " " means nothing will be drawn. Note that the ends of dash segments are decorated according to the selected Cap mode. Choosing Square caps will effectively cover a single gap in the dashing. You may want to use a different Cap mode or place two or more consecutive spaces in the dash pattern.
How to use the Curve tool
The Curve tool draws a smooth curve intersecting all given vertices. The Curve tool works very similarly to the Line tool.
With the Curve tool selected (in the toolbar above the canvas), click on the canvas and keep holding the left mouse button. Then move the mouse and release the button. This will create a straight line.
After you release the button, control handles will appear. Curve has two kinds of control handles:
- vertex control handles and
- segment control handles.
Initially, there will be 2 vertex control handles at the end of the line and 1 segment control handle in the middle of the line. You can drag the control handles with your mouse. Dragging the vertex handle will move the vertex. Dragging the segment handle will add a new vertex to the Curve.
Note that adding a new vertex or moving an existing one changes the whole curve as the curve needs to be recomputed to remain smooth. It is recommended to first all all vertices that will be needed and then fine-tune their positions.
The whole curve can be moved with the arrow keys or by dragging it.
If you are working in a vector layer, you may also scale and rotate the curve by holding down the SHIFT key while dragging the line.
Any fill style can be used with a Curve tool and in some cases, additional control handles of the fill style will be shown. Currently, outlines are not supported for Curves.
Scripting parameters
CURVE tool can be used from scripts. The command in script must have the following arguments:
- width - line width in pixels
- cap_style (optional) - one of "CROUND", "CBUTT", "CSQUARE" (default).
- coords - pairs of floating point numbers representing coordinates. There must be at least 4 numbers to define X and Y coordinates of two points.
- poly (optional) - "CLOSE" or "OPEN" (default). If "CLOSE" is specified, the last point will be connected to the first one.
Example
DrawTool.CURVE(Document, 5, "CROUND", 10, 10, 90, 90, 10, 170);See also: DrawTool object, Document object
 Recent comments
 Anonymous
on November 25th 2019
0
Anonymous
on November 25th 2019
0
y=logx
Anonymous
on December 1st 2024
0
how can i drag my drawing pls
 reddit
 Facebook share