 Sign in
More script examples are available in this forum topic.
Making scripted noise generator filter
This tutorial demonstrates how to use scripting to make a custom noise generator. It applies to all RealWorld Designer-based applications since version 2008.1.
A scripted filter?
Before you start learning about scripted filters, please spend a little time getting familiar with JavaScript (there are tons of good JavaScript tutorials online). Only the very basics are needed; if you are familiar with C, C++, C# or Java, you'll be fine.
The scripted filter created in this tutorial will eventually be able to generate images like the one below and it will have its own configuration dialog.
If you do not want to learn how to make your own filters, just scroll down and download the final filter, drop it on your toolbar and enjoy the noise.
Getting started with scripting
There is a menu item prepared for you to experiment with scripting. Click on "Custom operation" in "Effect" menu. The following window appears:
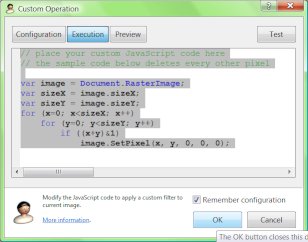
This short sample script demonstrates important concepts. Let's look at the details:
var image = Document.RasterImage;This line uses the Document global object. It asks the global object for the RasterImage interface. This may seem unnecessary, but RealWorld Designer applications support different document types (not just images) and even in case of images, there are plain and layered images. The sample command in the menu is pre-configured to only send the "current layer" to the scripted operation, hence it is safe to simply use the returned object without any more checking. Our filter will affect only the selected layer (if you are working with layered images).
var sizeX = image.sizeX;
var sizeY = image.sizeY;
These lines read the dimensions of the canvas and cache them in local variables.
for (x=0; x<sizeX; x++)
    for (y=0; y<sizeY; y++)
       if ((x+y)&1)
            image.SetPixel(x, y, 0, 0, 0);
This code deletes every other pixel. We will replace this code with our own. Look at the SetPixel method. It takes 4 coordinates and a packed color in hexadecimal AARRGGBB format. Of the 4 coordinates, only the first 2 are of interest to us.
Trivial noise generator
Let's make our first noise generator. Copy the following code, paste it to the dialog window and click OK.
var image = Document.RasterImage;
var sizeX = image.sizeX;
var sizeY = image.sizeY;
var count = Math.round(0.1*sizeX*sizeY); // 10% of pixels
for (var i = 0; i < count; ++i)
{
    var x = Math.round(Math.random()*(sizeX-1));
    var y = Math.round(Math.random()*(sizeY-1));
    var color = Math.round(Math.random()*0x1000000);
    image.SetPixel(x, y, 0, 0, 0xff000000|color);
}
The code should be quite self-explaining, but there are also a couple of new concepts:
- The count variable determines how many pixels to overwrite with noise.
- Math.round() rounds a floating point number to an integer.
- Math.random() returns a random floating point number in range 0-1.
- For each added pixel, its x and y coordinates are randomly chosen.
- Pixels' color is randomly generated (8bits per channel, hence the 0x1000000 factor) and opacity (alpha) is set to maximum using the 0xff000000 constant.
What if we wanted monochromatic noise?
Replace the var color = ... line with:
var color = Math.round(Math.random()*0x100);
color = color|(color<<8)|(color<<16);
Here, we are generating a number in range 0-0xff and then duplicating this value to all the channels.
What about Gaussian distribution instead of normal one
If you wanted Gaussian probability distribution, you can easily approximate it by adding a couple of random values and dividing them. Instead of Math.random(), use for example:
(Math.random()+Math.random()+Math.random()+Math.random()+Math.random())*0.2;Taking it to the next level
To generate stars or similar natural phenomena, it could be useful to be able to:
- Have a random intensity for each dot.
- Actually use dots (with random diameter) instead of single pixels.
- Use floating point for dot coordinates.
As hard as it sounds, it would actually be a simple change. While I am at it, I'll also put the parameters of the generator to the top of the code for easier adjustments.
var amount = 10; //percent
var dotsize = 4; //pixels
var monochrome = false;
var image = Document.RasterImage;
var sizeX = image.sizeX;
var sizeY = image.sizeY;
var dotsurface = 3.1415*dotsize*dotsize/4;
var count = Math.round(amount*0.01*sizeX*sizeY/dotsurface);
for (var i = 0; i < count; ++i)
{
    var x = Math.round(Math.random()*(sizeX-1));
    var y = Math.round(Math.random()*(sizeY-1));
    var r = Math.round((Math.random()+Math.random()+Math.random()+Math.random())*0.125*dotsize);
    if (monochrome)
    {
        var level = Math.random();
        DrawTool.SetColor1(level, level, level, Math.random());
    }
    else
    {
        DrawTool.SetColor1(Math.random(), Math.random(), Math.random(), Math.random());
    }
    DrawTool.ELLIPSE(image, x, y, r);
}
The 3 variables at the beginning of the script influence the outcome:
- amount controls the relative number of dots.
- dotsize is the maximum dot diameter.
- monochrome allows you to select color or monochromatic noise.
Points of interest:
- Have a look at the dotsurface and count variables. Since dots can have variable sizes, the number of drawn dots is divided by an average surface to keep the amount parameter independent on dotsize.
- Instead of setting individual pixels, we are relying on the ellipse tool, which is accessed via the DrawTool global object. The random radius parameter is using Gaussian distribution to make more dots average.
- Prior to drawing the dot, its color is set using the SetColor1 method.
Adding user interface
The noise generator works fine, but it would be better with a nicer configuration window.
First, replace the first 3 lines with the following code:
var amount = Configuration.GetValueOrDefault("amount", 10);
var dotsize = Configuration.GetValueOrDefault("dotsize", 4);
var monochrome = Configuration.GetValueOrDefault("monochrome", false);
This code will read configuration values from the Configuration global object. But before they can be read, someone must actually put them there. We'll do that right now.
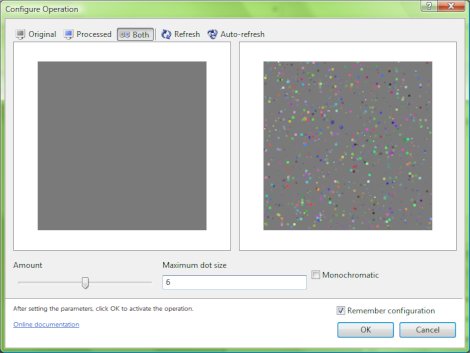
Click on the Configuration button near the top of the dialog. Put the following code into the text area:
Configuration.AddSlider("amount", "Amount", "", 0, 100,
    Configuration.GetValueOrDefault("amount", 10));
Configuration.AddEditBox("dotsize", "Maximum dot size", "",
    Configuration.GetValueOrDefault("dotsize", 4));
Configuration.AddCheckBox("monochrome", "Monochromatic", "",
    Configuration.GetValueOrDefault("monochrome", false));
Also, on Preview page, select Image - Viewer  . This will add a preview to the configuration window.
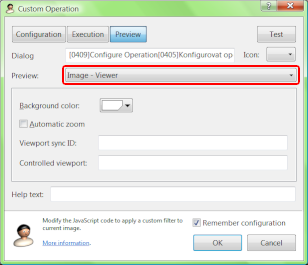
You may also configure the caption, icon and help text (displayed at the bottom) of the configuration dialog.
Once you click OK, your configuration dialog appears.
Wrap it up
Although numerous minor issues remain, the base of the work is done. You have learned the basics of the scripting system in RealWorld Designer applications.
The biggest flaw right now is the fact that you are still accessing the noise generator through the Custom operation menu item. Moving it elsewhere is not hard, but requires knowledge of the GUI layout concepts, which are out of scope of this tutorial.
For now, you can download a fine-tuned noise generator (noise-generator.rwcommands) and drag and drop it onto the toolbar with your image filters.
 Recent comments

Bookmark and share
 reddit
 Facebook share
Graphics resources links
Vista & Win 7 icons
Find out how Vista icons differ from XP icons.
See how RealWorld Icon Editor handles Vista icons.