 Sign in
Media panel
Media panel is available in some RealWorld Designer-based applications and allows accessing and using files from the tagged storage directly.
Configuring the media panel
After installation, the media panel is usually empty. The Media tab of the Online page lists media packs available. Clicking on install link next to a media pack downloads it and puts it into the tagged storage.
Once you have files in your tagged storage, you can display them in the Media panel. To do that, click on the Activate tag button and select the appropriate tag. The tag appears on the toolbar and you can click on it to deactivate the tag.
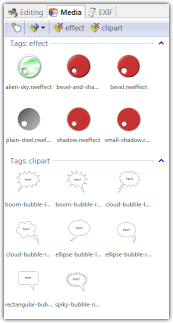
How to use items in the Media panel
Items in the Media panel can be used by double-clicking them or by right-clicking them and selecting Use from the context menu. The result of using an item depends on the actual item:
- If a layer style (.rweffect) is used, it is applied to current layer(s).
- If a vector image is used (.rvi), the objects of the vector image are pasted to current vector layer. If the current layer is not a vector layer, a new vector layer is created.
- If a raster image is used (.png, .jpg, ...), the image is added as a new raster layer.
- If a 3D model (.u3d) is used in a 3D editor, it is added to the scene (RealWorld Icon Editor only).
How to add your own files to the media panel
You can drag and drop files from Windows file manager onto the Media panel - after doing that, it is recommended to add tags to the dropped file from its context menu.
You can also directly save files open in RealWorld apps to the media library. In a save window, switch to the Tagged library tab to do that.
Tutorial video
Narration transcript
How to use downloadable media in RealWorld applications
There is a new Media tab in the latest RealWorld Paint. In other RealWorld editors, this panel may appear in differen places - look for an icon with three books.
But the media panel is empty. How can you add something to it?
Close the image and go to the Online page. Switch to the Media tab. Click on Download links to install the media packs you like. I'll download 3 packs - bubbles, smilies and basic styles.
When the download is over, create a new image. Now, you can see some of the downloaded content, but not all. That is because only 2 tags are currently selected: effect and clipart. Clicking on a tag deactivates it. Clicking on Activate tag displays list of available tags. Click a tag to activate it.
Using an image item adds it as a new layer. You can also double click an item to use it. You can delete a layer and add another item at any time. You can re-arrange layers by dragging and dropping them.
Let's look at the items with the effect tag. These are not images, but saved layer styles. Double-clicking one of them sets a style to the current layer.
Now activate the clipart tag. Double-click one of the bubbles. It will be added as a vector layer, because it is a vector image. Hold down SHIFT to rescale the bubble, then release SHIFT and move it into position. You can also adjust the text.
Use a layer style to add shadow and beveling to the bubble.
You can add your own items to the media panel by dragging and dropping them on the panel. Set tags for the item from a context menu. You can also delete them from the context menu.
Another way to add items to the media panel is by simply saving them to the Tagged library. All save windows allow you to do this, including the window for style saving.
By using the Media panel, you can create your own library containing all things you use often and always have them ready.
 Recent comments
Bookmark and share
 reddit
 Facebook share
Graphics resources links
Select style
Vista & Win 7 icons
Find out how Vista icons differ from XP icons.
See how RealWorld Icon Editor handles Vista icons.