 Sign in
 Anonymous
on July 4th 2013
0
Anonymous
on July 4th 2013
0
WHO CAN SAY ME HOW TO DO IN MIRROR MODE !?! 😞
The splash image with layers: rwpaint-splash.rli
Get RealWorld Paint from RWPaint homepage
Welcome to another of my tutorials. This one will be a bit different. Instead of showing you how to draw something, I'll show you how I used layer styles while making the splash screen for the new RealWorld Paint.
You'll find a link to the image file in the description. Download it, open it and look at the layers with me. There are about 10 layers. Click on the "Show active layer only" button in the toolbar and inspect individual layers. There are those paint splashes, the grass, the text, the signpost parts and one more mysterious layer at the end.
Let's stop for a moment and click on the "Emphasize current layer" button. This viewing mode could be handy in some situations. While the selected layer is drawn normally, the opacity of all other layers is lowered. You can see parts of the current layer that would be obscured otherwise.
OK, switch back to the normal viewing mode (click "Show all layers") and let's look at the layer styles. Click on the "Layer style" button and then on the "Modify style" menu item.
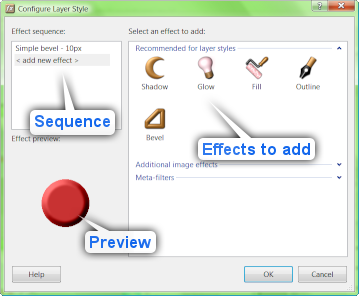
A layer style configuration window appears. In the top left corner is the list of the active effects.
The first effect is the Fill effect configured as a wood texture. The second step is again the "Fill" effect, but this time it is using a linear gradient and the "Paint over" blending to make the lower part darker. The effect is very subtle. The third step is the good old bevel effect and the last step is a shadow. So, this what a layer style can do with a simple black shape.
The style on the next layer is very similar. There are different wood colors used and also an inner shadow.
The next layer is the contains the "Paint" word.
Look closely on the first effect, it is a 2px black outline. But there is a Gray solid fill step following it. Look what happens when I change the width of the outline. The font I used was not bold enough for my liking and so I used the Outline effect to make it bolder. The rest of this layer style is trivial. There is a bevel, an actual single-pixel black outline and a shadow.
There you see it, a small bevel and an outline. If I turn off the layer styles, you can see what the actual text looks like, it is less bold.
The next layer is the "RealWorld" word. Again, the outline and then there is the red-yellow-green gradient. You can of course easily create your own gradients. The rest of this style is the same as before.
Now, we are getting to the grass layers. They use the "Fill" effect again, this time with a cloud generator for an organic feel. There is also another "Fill" effect used that adds more details with a semitransparent wood generator.
Did I mention that you can make changes to the layers and the styles are instantly applied to the changed layers? I hope you already knew that.
The second grass layer is very similar, it just uses brighter green colors.
Now we are getting to the 3 colored paint splashes. The layer styles are quite simple in these cases. They just add an outline and a shadow.
Now the time has come to return to the mysterious last layer. When you look at it with layer styles turned off, it looks similar as the splash. In fact is it one of the earlier versions of the splash. What's interesting here is the layer style. The first step is our favorite "Fill" effect again, this time using linear gradient with two semitransparent blacks. Then there is a large blur. The third step is a perspective Transformation effect. The last step is a blur again.
It may not be trivial to see, but this layer style create a projected shadow from the source image (that's why the layer contains a copy of the entire splash).
If I delete part of the source image, the shadow disappears. Remember, I am deleting just the image in this layer, what you see is a composition of all the layers, so only the current layer - the shadow - is affected. Just what I want.
What else can you do with layers?
You can design your own styles. When you click on the "Add new effect" item in the layer configuration window, you'll be presented with a list of compatible effects. Hover over the effects and watch the preview changing.
You can even use a Photoshop-compatible plug-in or a JavaScript operation as a layer style.
You can save your styles and you can open and assign them to layers. Click on "Open style...". Oh, look, I have no layer styles in my library. Let's fix that.
Close the document and switch to the "Online" page. Then switch to the "Media" tab and click on download next to the "Basic styles" pack.
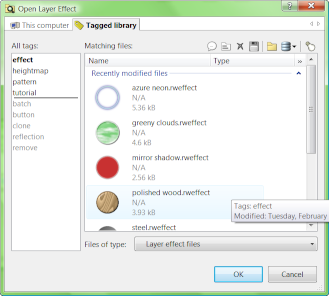
Reopen the file and click on "Open style" again. There they are, a few styles to get you started. Let's try the "blue-neon" style. See? The previously green splash looks completely different with this style.
Thanks for watching and I hope you will amaze me with your creative designs. Do your own modifications of the RWPaint splash and post it on your blogs (as .png files please so that everyone may easily see them).
 Recent commentsAnonymous
on July 4th 2013
0
Recent commentsAnonymous
on July 4th 2013
0
WHO CAN SAY ME HOW TO DO IN MIRROR MODE !?! 😞
Anonymous
on June 28th 2014
0
free gut 😊
Anonymous
on September 7th 2014
0
Ok this is totally the BEST CURSOR EDITOR EVER!!!!!!!!!!! MY CURSOR IS BOSS BROS!!!!!!!! 😁 😊 😎
Anonymous
on October 22nd 2016
0
Is there a way to put to colors on a layer and smudge them together? 😞
Anonymous
on April 30th 2018
0
thanks
😎
who is my friend?
Anonymous
on February 17th 2019
0
I live remotely with No internet most of the time, it would nice to enable viewer to download Tutorial video for viewing on line, to get steady internet I travel 30-40KMS with my laptop and a power supply generator.
Anonymous
on August 16th 2021
0
😎 8-) 😎
Anonymous
on November 20th 2021
0
its good i costumise my win 10 cursors
Anonymous
on May 3rd 2023
0
realistic effect
 fnaf_fan219
on September 9th 2023
0
fnaf_fan219
on September 9th 2023
0
thans baud its a vary gaad tutorioal lav it 😞 :-( 😁 :-D 😞 :-( 😞 :-( 😞 😉 ;-) 😊 :-) 😉 ;-) 😉 ;-) 😉 😴 😎 8-)
 reddit
 Facebook share