An easy-to-use and free tool for batch resizing of JPG pictures and photos.
 |
How to use it?
- Download PhotoResize400.exe and place it on your desktop.
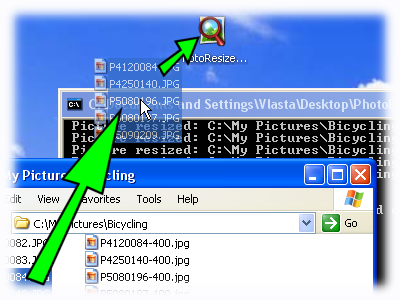
- Drag and drop JPG files or folders with JPG files on the application icon.
- The tool will resize JPG images and save them next to the originals. Names of the new pictures will
be based on the original names, with a suffix indicating their size. For example, the resized version of MyPhoto.jpg will
be called MyPhoto-400.jpg, where the number 400 indicates the size of the picture.
|
Configuration
The size of output pictures is controlled by the name of the application. To rename it, click on the icon to select it
and do one of these things: press F2 key, click in the text under the icon, or right-click the icon and select Rename command in the menu.
Depending on your settings, you'll either see ".exe" on the end or not. If you see it, keep it there, if you do not see it, do not add it.
For more advanced scenarios, you'll need to use the command line parameters. Learn about them on the advanced settings page.
Highlights
- The tool is using high-quality resizing method, where color of each pixel is a weighted average of all covered pixels from the original image. Linear interpolation is used when zooming in.
- The algorithm is optimized to work with gamma-corrected pictures.
- High speed.
Maximum number of images
Picture Resizer does not limit the number of images resized at once, but there are other factors
that may impose a limit.
When files are dragged and dropped on the tool icon, Windows Explorer sends the names of the dropped
files as command line parameters to Picture Resizer. Windows has a limit on the total length of command line.
If the filenames(+paths) are longer than the limit, Explorer will not run the tool and display an
error instead.
To work around this limitation, drag and drop entire folders instead of individual files or place
your files closer to to the root of your hard drive (e.g. place them into C:\imgs instead of
C:\Documents and Settings\YourUserName\My Documents\My Pictures\Vacation\).
Notes
- The application is provided as is, without warranty of any kind. Authors are not responsible for any damage.
- Refer to the download section below to get versions for 98, Me, or 64-bit (x64) version of Windows.
- When using the application from command line, specify absolute path to the source files or folders. Relative paths will result in undefined behavior.
- Files in the destination folders are always overwritten unless they have the readonly flag set.
Related tools from the author
Name codes overview
Resizing method
- PhotoResize400.exe - maximum side 400 pixels.
- PhotoResize_400.exe - minimum side 400 pixels.
- PhotoResizeF400x300.exe - frame size of 400x300 pixels. The resulting image width will be smaller or equal to 400 and its height will be smaller or equal to 300 pixels.
- PhotoResizeW400.exe - width set to 400 pixels. Height automatically computed to keep aspect ratio.
- PhotoResizeH400.exe - height set to 400 pixels. Width automatically computed to keep aspect ratio.
- PhotoResizeP50.exe - resize to 50%.
- PhotoResize400x300.exe - resize to exactly 400x300 pixels. Aspect ratio is not preserved.
- PhotoResizeD100.exe - resize to 100DPI. Physical size stays the same.
- PhotoResizeD100T.exe - overwrite the resolution information in the header without touching the pixels.
- PhotoResizeK20.exe - resize to approximate maximum size of 20kB.
- PhotoResizeG1024x768.exe - use content-aware resizing to change aspect ratio while preserving content.
- PhotoResizeA400x300.exe - crop and resize to 400x300 pixels. The central part is preserved and resized while the borders are cropped.
- PhotoResize400x300x5.exe - extend canvas and resize to 400x300 pixels. The last number (0-9) controls canvas brightness.
Additional options
- PhotoResize400R.exe - process recursivelly all sub-folders.
- PhotoResize400C.exe - place files to current folder (current folder can be specified in shortcut properties).
- PhotoResize400S.exe - skip files already smaller than the requested size.
- PhotoResize400O.exe - do not wait for Enter.
- PhotoResize400U.exe - skip files already existing in the destination location.
- PhotoResize400N.exe - sharpen image.
- PhotoResize400I.exe - overwrite source files.
- PhotoResize400M.exe - copy metadata.
- PhotoResize400E.exe - preserve file modification time in addition to file creation time.
- PhotoResize400A.exe - use arithmetic compression.
- PhotoResize400V.exe - auto-rotate be EXIF tag.
- PhotoResize400X.exe - process landscape (width >= height) pictures only.
- PhotoResize400Y.exe - process portrait (width < height) pictures only.
- PhotoResize400Q50.exe - set compression quality to 50%.
What's new in version 6.0
- Limit processing to landscape (width >= height) or portrait (height < width) files with PhotoResize400X.exe and PhotoResize400Y.exe. This allows you to process your image library in 2 steps applying different options to landspace and portrait pictures.
- Rotate pictures by EXIF orientation tag while resizing them with PhotoResize400V.exe.
- Higher accuracy resampling method improves quality in darker areas.
- Support for JPEG arithmetic compression for both decoding and encoding. PhotoResize400A.exe creates JPEGs with arithmetic compression. Please note that very few applications support arithmetic compression at this moment, but probably will in the future, because the patents have recently expired. Arithmetic encoding reduces file size by ~10% while keeping the same quality.
A bugfix update 6.0.1 was released on February 13th 2012.
What's new in version 5.0
- Extend canvas+resize with PhotoResize400x300x5.exe. - The last number (5 in this case) sets the brightness of the canvas 0=black, 9=white, 1..8=shades of grey.
- Limit processing to files with names matching given pattern with -z switch. For example -za*.* will only resize files starting with 'a' character. * and ? can be used in the pattern.
- Command line window is closed when the tool is started without parameters and displays information screen. A donate button was placed on the window to make donators' life easier.
What's new in version 4.0
- Crop+resize with PhotoResizeA400x300.exe.
- Preserve file modification time PhotoResize400E.exe.
- <CREDATE> template for custom destination path switch (-c) to automatically classify files by date.
- -XofN command line switch to split a large resizing batch to parts that can be run consecutively
or in parallel on mutliple computers. By using different switches (for example -1of3 -2of3 -3of3), only a fraction of all files will be processed in each run.
What's new in version 3.5
- Quality setting using file name PhotoResize400Q85.exe.
- Ability to skip files already existing in the destination folder - do quick incremental updates - PhotoResize400U.exe.
- Command line switches for chroma subsampling.
What's new in version 3.0
- B&W (grayscale) jpeg images are supported.
- Creation date of the resized file is preserved.
- Explicit multi-core and multi-processor support. If multiple files are resized, all cores will be utilized.
Hyper-threaded processors are also supported, but the speed gain will not be significiant.
- Image re-targeting support (<- worth clicking ;-)). Combination of resampling and image carving techniques is used to
obtain image that fits the specified rectangle. Activated using -gWxH switch or by the G letter: PhotoResizeG1024x768.exe.
Run Picture Resizer from context menu of .jpg files and folders
Version 2.0 introduces a new usage scenario. The tool supports intergration with Windows shell
and allows you to define one or more commands that are added to Windows Explorer context menu
(the menu that appears when you right-click on a file). Separate each switch by space, just like on command line.
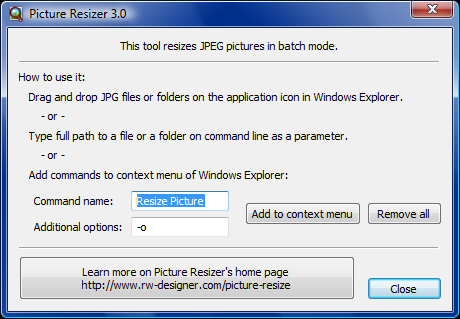
To add a command to context menu, start the tool and type the name of the command to the "Command name"
field and additional command line options (if you want to use them) to the "Additional options" field.
Finally click the "Add to context menu" button.
To remove all created commands, click the "Remove all".
Version 2.0 allows you to add multiple commands to context menu of .jpg files.
PhotoResize was recently updated to be compatible with Vista Explorer - you can use it as a replacement for the missing Image Resizer PowerToy.
What's new in version 2.0
- Custom destination folder and file name - the -c switch was enhanced and allows specifying
a template for output file path. More details here. Simple examples:
- Default behavior of the tool equals -c<ROOT><PATH><NAME>-<SIZE>.jpg
- To put resized files into folder C:\Resized Images, use "-cC:\Resized Images\<PATH><NAME>.jpg"
(the double quotes are needed, because, there is a space in the path).
- To simply put files to current folder of the process, use -c<NAME>.jpg Make sure that the current folder is set on command line prior to running the tool.
- New predefined output quality - PhotoResize400G.exe for good quality (75%).
- PhotoResize400O.exe skips the need to press Enter when the tool finishes (and also blocks progress report).
- PhotoResize400F400x300.exe ensures that the resulting image fits into the defined frame.
What's new in version 1.5
- Independent DPI mode - change only DPI or only number of pixels by using the T letter in tool's filename:
- PhotoResize400T.exe will resample to 400 pixels and keep the original DPI.
- PhotoResizeD100T.exe will not resample the image, but will set JPEG header DPI to 100.
- Sharpen the resized image with PhotoResize400N.exe.
- Skip files that are already smaller than the required size using PhotoResize400S.exe.
- Resize images by setting approximate maximum target size in kilobytes PhotoResizeK50.exe (experimental).
What's new in version 1.4
- Do in-place resizing (overwrite original file) - PhotoResize400I.exe.
- Set compression quality of output image with a -q command line switch or
rename to PhotoResize400H.exe for high quality or to PhotoResize400L.exe for low quality.
- Copy metadata (including EXIF tags) to the resized file - PhotoResize400M.exe.
- And finally a simple trick contributed by one of Picture Resizer's users that lets you run
the tool from Explorer context menu:
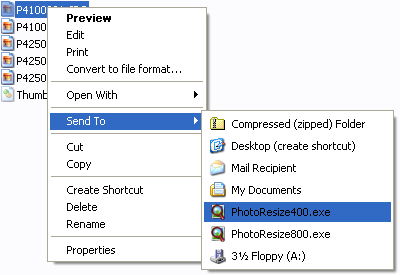 |
Open Windows Explorer and go to your "Send To" folder (usually C:\Documents and Settings\<your user name>\SendTo).
Place one or more configured copies of Picture Resizer there. Items placed in this folder will appear in Send To
context menu as demonstrated on the picture.
Tip: you may change the tool's name to for example "Resize to 400.exe" instead of "PhotoResize400.exe".
|
What's new in version 1.3
- Resizing to a percentage of original size PhotoResizePxxx.exe, where xxx is a number from 1 to 10000 [%].
- Resizing by setting target DPI - PhotoResizeDxxx.exe. If the source image does not define DPI, it is assumed to have 100 DPI.
- Command line options to override parameters from filename - advanced settings.
- Adjustable output helps creating custom reports or web pages when resizing images - advanced settings.
What's new in version 1.2
- The tool can resize images in all subfolders of a folder - PhotoResize400R.exe.
- Resized images can be placed in another folder: Photo Resizer advanced settings.
- Added versions for Windows 98, Me and 64bit Windows (x64).
What's new in version 1.1
- Fixed a bug that sometimes caused recursive resizing of already resized pictures.
- Added new modes, where the images can be resized to specified width (rename to PhotoResizeW400.exe), height (rename to PhotoResizeH400.exe), or to a minimum size (rename to PhotoResize_400.exe).
Download
Version 6.0 from November 6th 2010:
Version 3.0 from April 14th 2008:
Other resources
Learn more about images in article 'What is a computer image?'.
How can you help?
You are welcome to help PhotoResizer by:
- Donating bitcoins to address: 14Lrhpq3WxRGtTA5BF25ZSsKtnnt3nGinP
- Suggesting a new feature - leave a short note in the comment section or start a new topic on the discussion board.
- Introducing the tool to more people - if your friend is looking for an image resizer, let them know about this one.
The more people use it, the happier is the author.
- Translating this page - help people in your country and translate the information about PhotoResizer for them. The translation can be placed
on this server.
- Linking to this page from your image-related web site or blog.
 Recent comments
 Sign in
 Anonymous
on December 27th 2024
0
Anonymous
on December 27th 2024
0
 Share
Share
 Tweet
Tweet
 Share
Share  reddit


